

Rachel Tomlinson, Beauty Editor.
There is a cleansing brush sitting in a lot of bathroom drawers right now, charged once, used for two weeks, then quietly retired next to the jade roller. If that sounds familiar, the device probably was not the problem. Most people never learn the handful of habits that make a facial cleansing brush actually earn its keep: how long to hold it in one spot, how much pressure to use, when to replace the head, and what to put on it before it touches skin. One fact worth knowing before anything else: bristle motion does most of the work, not bristle stiffness, which means a soft, well-maintained brush head can outperform an expensive new one used carelessly. This guide walks through the technique side of facial cleansing devices, so the one already in your drawer can do what it was built to do.
- Technique matters more than the device: how you move the brush and how long you hold it in each zone changes results more than the brush’s price or motor type.
- Less pressure works better than more: pressing harder does not clean deeper, it mostly irritates the skin barrier and can leave the brush head splayed and less effective.
- A dirty brush head undoes the benefit: bacteria and residue trapped in bristles can reintroduce the same buildup you are trying to remove, so replacement and rinsing schedules matter as much as technique.
Why The Brush Is Not Doing What You Think It Is Doing

A cleansing brush does not dissolve makeup or sunscreen. The cleanser does that chemically. The brush’s job is mechanical: it agitates the cleanser across skin so it reaches into pores and fine texture that fingertips glide over. Think of it the way a soft-bristle scrub brush works on a cast-iron pan: the soap breaks down the grease, the brush just moves the soap into contact with more surface area, more evenly, than a rag would.
That distinction matters because it explains why buying a stronger motor rarely fixes bad results. If the cleanser sitting on the bristles is not formulated to lift oil and debris, no amount of oscillation will compensate. A 2021 study in the Journal of Cosmetic Dermatology, following 40 participants over eight weeks, found that sonic cleansing devices removed measurably more makeup residue than manual washing only when paired with an oil-based or surfactant cleanser suited to the user’s skin type. Water alone on the brush performed close to fingertip washing.
The practical takeaway: the brush amplifies whatever you put on it. A gentle cleanser gets gently amplified. A cleanser too harsh for your skin gets that harshness spread more thoroughly, faster. Before troubleshooting technique, it helps to know what you are actually applying with the device, since the brush is a delivery method, not a formula.
Reading Your Device’s Settings Before You Use Them
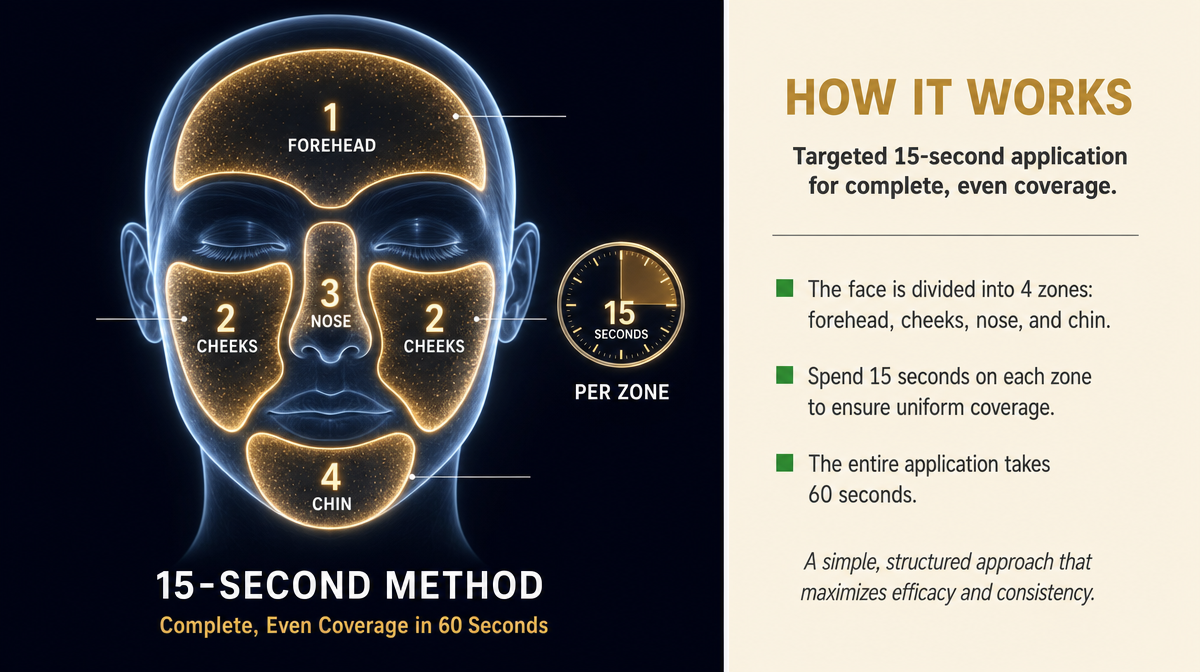
Most facial cleansing devices ship with two or three speed settings and sometimes a timer that pulses every 20 or 30 seconds to signal a zone change. Very few owners read the insert closely enough to notice the pulse pattern is a built-in map of the face: forehead, each cheek, nose and chin, roughly matching how dermatology offices divide the face for treatment zones.
If your device pulses, that pulse is not a decoration. It is telling you to move to the next section. Staying too long in one zone, usually the T-zone because it feels oiliest, is one of the most common habits that leads to irritation along the nose and chin while the cheeks get shortchanged.
Self-test: next time you use the device, time yourself without looking at the built-in timer. Most people spend nearly twice as long on the center of the face as on the outer cheeks and jawline. If that is you, try setting a phone timer divided into four 15-second increments and moving on a cue rather than by feel.
Speed settings matter less than most marketing implies. A 2019 review in Skin Research and Technology noted that higher oscillation speeds increased perceived cleanliness scores among users but did not correlate with measurably lower residual makeup on tape-strip testing. In practice, the lowest or middle setting is enough for daily use; higher settings are better reserved for occasional deeper cleansing, not nightly rotation.
The Pressure Mistake Almost Everyone Makes
Pressing a cleansing brush harder against the skin feels productive. It is usually counterproductive. The bristles are designed to flex against skin at a light touch, similar to how a soft paintbrush loads and releases paint best without being jammed against the canvas. Push too hard and the bristles splay sideways instead of moving in their intended pattern, which reduces the actual cleansing motion while increasing friction against the skin surface.
The American Academy of Dermatology’s public guidance on cleansing recommends a gentle touch for any mechanical exfoliation tool, noting that excess pressure can compromise the skin’s outer barrier over repeated use. That barrier disruption shows up as tightness, flaking, or a stinging sensation when other products are applied afterward, often mistaken for a reaction to a new moisturizer when the brush pressure was the actual cause.
A simple way to judge appropriate pressure: let the device’s own weight, plus a light guiding hand, do the work. If you can hear or feel the bristles catching or dragging rather than gliding, you are pressing too hard. Skin should look pink at most immediately after cleansing, never red, and any pinkness should fade within a few minutes.
This is especially relevant during dry winter months with indoor heating, when the skin barrier is already under more stress. Many people increase pressure in winter, assuming heavier hands compensate for drier skin, when in fact lighter pressure and a richer cleanser serve the skin better in that season.
Matching Cleanser Texture To The Brush
Not every cleanser belongs on a brush. Thick, waxy balms and cleansing oils tend to gum up bristles and are usually better massaged in by hand before a brief brush pass to emulsify. Foaming and gel cleansers, by contrast, spread easily across bristles and rinse clean, which makes them the more forgiving choice for daily brush use.
A household comparison: think of the difference between working dish soap into a sponge versus trying to work in a spoonful of solid shortening. One spreads and lathers; the other just sits there until you add water and effort. Cleansing balms often need that same pre-melt step in your palms before the brush touches them.
People with visibly reactive or easily flushed skin may find that any brush use with an active-ingredient cleanser, one containing salicylic acid or retinoid-adjacent compounds, intensifies irritation because the mechanical action helps drive the active in faster than intended. Dermatology guidance generally suggests reserving actives for hands-only application and keeping the brush for plain, gentle cleansers.
A quick self-test: apply your cleanser to the back of your hand and try to work it into a light lather with wet fingers. If it lathers and rinses cleanly there, it will behave the same way on the brush. If it stays tacky or oily on your hand, it likely needs a hand-massage step first.
Why The Brush Head Matters More Than The Handle
The motor inside a cleansing device rarely wears out within a normal ownership period. The brush head does. Bristles lose their spring the same way a toothbrush does, and most manufacturers suggest replacement around every three months with regular use, though heavier daily use or coarser bristle types may need it sooner.
A worn brush head does not just clean less effectively, it can actively work against you. Splayed or frayed bristles trap more residue between uses and distribute it unevenly, which is part of why some people report breakouts appearing in a pattern that mirrors where the brush sits heaviest, often along the chin and jawline.
There is no universal visual cue for when to replace a head, since wear depends on water quality, cleanser type, and storage. A reasonable habit is to mark a calendar reminder every twelve weeks rather than waiting for visible fraying, which tends to show up after performance has already declined.
Storing the brush head upright and open to air between uses, rather than capped or lying in a damp shower caddy, slows bacterial buildup and helps bristles dry fully, which extends usable life somewhat even before replacement is due.
Cleaning The Brush Itself
A cleansing brush that is never cleaned becomes a reservoir for the exact residue it is meant to remove. Rinsing bristles under running water immediately after use, then giving them a light squeeze rather than a twist, removes most surface debris. A weekly deeper clean, a drop of gentle cleanser worked into dry bristles and rinsed thoroughly, addresses buildup that plain water rinsing misses.
Mayo Clinic’s patient guidance on skin hygiene notes that tools left damp in enclosed spaces, such as a closed shower caddy, provide favorable conditions for bacterial growth, a caution that applies directly to brush heads stored wet in humid bathrooms. Coastal and East Coast summer humidity makes this worse, since bristles simply take longer to dry fully compared to a dry winter bathroom with a running heater.
A brush head that smells faintly sour or looks visibly discolored at the base has usually passed the point where cleaning alone fixes it and should be replaced rather than nursed along. Waiting past that point tends to show up as small, repeated breakouts along whichever part of the face gets the most brush contact.
Judging Results Honestly, And On The Right Timeline
Cleansing brushes are not exfoliating acids or retinoids, and their visible effect is more modest and slower to notice. The realistic change most people can expect is smoother texture to the touch and slightly more even makeup application, generally visible within two to four weeks of consistent, correctly-pressured use, not overnight.
Pore appearance is the claim most often oversold. A cleansing brush can reduce the look of congestion by keeping pores clearer of surface debris, but it does not change pore size, which is largely structural. Expecting pores to shrink is the most common source of disappointment with these devices, and it sets people up to blame the brush for something it was never going to do.
A fair way to judge whether the brush is helping: take a plain, makeup-free photo in consistent daylight once a week for a month, same distance, same light. Texture and tone changes are easier to see in comparison than in the mirror day to day, where gradual change is hard to notice. If nothing has changed in texture or breakout frequency after a month of correct technique, the device may not suit your skin type, and that is worth knowing rather than pushing through discomfort on the assumption that results just need more time.
What Actually Matters Versus What Is Marketing
Sonic versus rotating, silicone versus nylon bristles, app-connected tracking: most of the feature language on cleansing device packaging describes differences with limited evidence behind them for typical home use. Silicone surfaces are easier to keep hygienic since they do not hold water the way bristle clusters do, which is a genuine, verifiable advantage for people prone to breakouts. Beyond that, the meaningful differences mostly come down to the habits covered above: pressure, timing, cleanser pairing, and replacement schedule.
A drugstore-tier device used correctly, with fresh bristles and the right cleanser, will generally outperform a higher-end device used with old, worn bristles and heavy pressure. That is not a popular thing to hear in a category built around upgrading, but it holds up against how these tools actually function mechanically.
If you already own a device that has become a once-a-month afterthought, the fix is rarely a new one. It is usually a fresh brush head, a lighter hand, and an honest four-week trial with a cleanser that actually lathers well on the bristles. That combination costs far less than replacing the whole device, and it is the version of “holy grail” most people are actually looking for when they ask which brush to buy next.
Key Takeaways
- The brush amplifies whatever cleanser is on it; it does not replace the cleanser’s job.
- Move through zones evenly using the device’s built-in timer rather than lingering on the T-zone.
- Let the device’s weight do the work; heavier pressure splays bristles and stresses the skin barrier.
- Match cleanser texture to the brush: foaming and gel cleansers work better than thick balms.
- Replace the brush head roughly every twelve weeks, sooner with heavy daily use.
- Rinse after every use and do a deeper weekly clean; store the head upright and open to air.
- Judge results over two to four weeks using consistent daylight photos, not day-to-day mirror checks.
This article is for general information only and is not a substitute for advice from a dermatologist or other qualified clinician.
Individual results vary depending on skin type, technique, and consistency of use.